Showing posts with label developmet. Show all posts

Sunday, June 11, 2017

USB Hidden File Recovery

The best and easiest way to recover hidden files in your removable disk is here,

806bb3add7753e0924b487a99c8537735d64caf1
If your USB drive is already infected by most common shortcut virus and your files are hidden this is the easiest way to recover the from being hidden.


How to Use:

First install the download(from above link) and install the software.

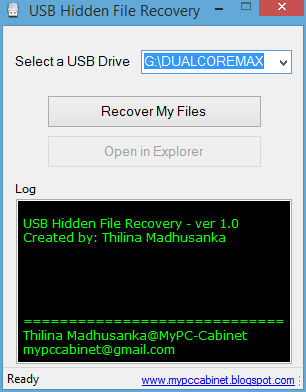
Open USB file recovery 1.1 and choose your USB drive from the list


Click on the "Recover My Files" and it will take some time to recover files depending on the used capacity of USB drive.


After successful recovery you can open USB drive using "Open in Explorer" button or from windows explorer. 

And your files will be visible.


Compatible with Win 10, Win 8.1, Win 8, Win7 and below OSs

Note: Do not open unknown directories or files because this software does not remove virus files.

For Win 7 and below OSs dot net framework 4.0 is needed  

Sunday, May 3, 2015

My Note – BETA


Description :


This is a notepad program developed by PC-Cabinet.
With this program you can write text files, HTML files, Java files, CSS ,Javascript ,Batch files and many more.


As this is BETA version errors and bugs are not totally corrected.


We will release our stable version shortly.


ClickHere to download My Note-Beta Version


ClickHere to download My Note-Beta Version zip file

Thursday, April 30, 2015

How to view basic information about your computer

How to view basic information about your computer

In Microsoft Windows you can view your computer's basic information easily. Here I'm going to list out how to do it.

Basically there are many ways to display computer's basic information.

Method 1

(for windows XP,vista and 7)
Click on the “start” button .In windows XP you can find it at the left side of the task bar. In Windows Vista and 7 there is a windows logo at left side of your task bar.

Then a menu will appear in left side of your monitor (with default task bar settings).
Then you can see a button named “computer”(actually this is not a button).
Then keep your mouse pointer on it and perform a right click.
Then again you can see a drop down menu. Here at the bottom you can see “Properties” click on it and now you can see your computer's basic information.

Method 2

In your desktop there is an icon named “Computer”(in Win 8,7 and Vista) or “My Computer”(In Win XP) .Then simply right click on it. Now there is a drop down list. Form that click on properties(at the bottom of the list).Now you can view your computer's basic information.

Method 3

(for windows XP,vista and 7)
Click on “Start” in task bar and click on control panel. Now you have control panel on your screen. If your view is “Control Panel Home” Then click on “System and Maintenance”.Then click on “System” and now you can view your computer's basic information.


If your view is “Classic view” Then double click on “System” and now you can view your computer's basic information.

Method 4

(for windows vista )
Click on “Start” then “All Programs” then “Accessories” then open “Welcome Center” . Here you can see some links to open various tasks.
Double click on “View computer details”. Now you can view your computer's basic information.
Method 5

(for windows vista and 7)
Open “Computer”. Then in computer window below the address bar there is a link name “System Properties”. Click on it.
There you can see your computer's basic information.


Method 6

Open “Computer” . Then right click on computer window (not on disk drives). Then in pop up menu You can see “Properties”. Click on it and your computer's basic information is on your screen.

Method 7

(for windows 8 and 8.1)
If you are in Start screen go to desktop by click on “desktop” tile or pressing “Windows key +D”. Then move your mouse to the right border of your screen. Then you can see a pop up menu. Then click on “Settings”. Then click on “PC info” and your computer's basic information is on your screen.
Method 8

(for windows 8 and 8.1)
If you are in Start screen go to desktop by click on “desktop” tile or pressing “Windows key +D”. Then press “Windows key+ i” combination. Then you can see a pop up menu. Then click on “PC info” and your computer's basic information is on your screen.

Method 9

(for windows 8 and 8.1)


Use key combination “windows key +x”. Then at bottom left of your screen pop up menu will appear. Click on “System” and your computer's basic information is on your screen.

---------------------Related articles----------------------


How to use sounds in a C# application

How to use sounds in a C# application

Various programs use various sounds to give an alert about various tasks. Here in C# we can use various sounds with form's load event,for a button click, for a check box etc... Basically there are two methods to use sound in C#.
First one is :-By using beep tones and second is by using audio files(.wav,.mp3 etc...).
So this post is about beep tones.
In Windows operating system there are various sounds to inform user about some tasks like “low battery”, “updates available” etc.. In some cases windows use beep tones also. So let's get know about how to use beep tones in a C# application.

First create new project and name it as “beeptest”.


Now double click on your form1 and here you have code window and you are at form's load event.

Then type this code →
                        Console.Beep();


and press “F5” or go to debug and click on “Start Debugging”.

Now you can here a beep tone when form loads.
Now try to use beeps with a button.
Now get a button to form and change it's text as “Click to beep” .


Then double click on the button and type this code in button's click event.
                      Console.Beep();


Now if you run this and click on the button you can here a beep tone.

Now let's study about the code “Console.Beep();”.
This is the general form of beep tones. But you can change the frequency of beeps. Now look at the code below.

                       Console.Beep(Frequency,Time period);

Here frequency varies from 37Hz to 32767Hz. If you want to use base sounds you can use low frequencies like 37,40 ,50 39 etc..

Time period means the amount of time that you can here the beep. Here in C# to here a beep sound for a 1 second you must use time period as “1000”.

Now get a new button and code this in it's click event.
                         Console.Beep(400,1000);
After running and clicking on the button1 you can here a beep tone with 400Hz frequency for a period of one second.
Try some more examples by changing frequency and time period.

Now I think you have got it.
Here we are going to make a soft organ with the help of beep tones.
Now open a new project and name it as “softorgan”.
Now change your form's name as you like or keep it as it's default (form1).
Here we have to use 13 buttons.
Get a button to the form.
Now change it's text property as “&S”.
Now get a label to the form and keep it under the button and change it's text property to “C”.
Now get another button and change it's text property as “&E”.
Now get another label to the form and keep it under the button and change it's text property to “C#”.
Accordingly get another 11 buttons and change there text properties as , “&D”, “&R”,“&F”,“&G”,“&Y”,“&H”,“&U”,“&J”, “&I”, “&K” and “&L”. Then get 11 labels and change their text properties as “D”, “Eb”, “E”, “F”, “F#”, “G”, “Ab”, “A”, “Bb”, “B”and “C”.
Now look at the picture below and align your buttons and labels as keys in keyboard.

Now it's time to code.

Double click on key C (first button) and type this code →
                                 Console.Beep(261,200);
Now code these codes accordingly second button and so on.
Second button(C#)        Console.Beep(277,200);
Third button(D)             Console.Beep(293,200);
Fourth button(Eb)         Console.Beep(311,200);
Fifth button(E)              Console.Beep(329,200);
Sixth button(F)              Console.Beep(349,200);
Seventh button(F#)       Console.Beep(370,200);
Eighth button(G)           Console.Beep(392,200);
Ninth button(Ab)          Console.Beep(415,200);
Tenth button(A)            Console.Beep(440,200);
Eleventh button(Bb)     Console.Beep(466,200);
Twelfth button(B)         Console.Beep(494,200);
Thirteenth button(C)     Console.Beep(523,200);


You can change the amount of time period by increasing or decreasing the value “200”.

Now it' time to play our soft organ.
Press F5 or go to debug menu and click on “start debugging”.
Now you can play using your mouse or using appropriate key in your keyboard.
(ex: to play C press “s” in your keyboard)
Thank you!


Related articles -------------------------


Tuesday, April 7, 2015

How to print alphabet using char values in JAVA

First you have to code a java program by using variables and a flow control.

You may need:
  • a char variable to store current char value
  • flow control structure (for,while,or do while loop)
  • command to print current char value
First we create a class program and a main method using java

class ascii{
           public static void main(String args[]){

           }
}

Now create a char variable to store a char value and initialize it to zero.

class ascii{
          public static void main(String args[]){
                      char c=0; //char variable named c
          }
}

Now we want a flow control structure to automate printing process. Here I used for loop but you can use while or do while loop also.

class ascii{
           public static void main(String args[]){

                     char c=0; //char variable named c

                     for(c=65;c<91;c++){

                     }
          }
}

Here I have initialize c as 65 (c=65) because “A” in ASCII is 65 and terminate value as 91 because here I stop printing process after printing “Z”.

Now we want a command to print this in command prompt screen.

class ascii{
           public static void main(String args[]){

                    char c=0; //char variable named c

                    for(c=65;c<91;c++){

                               System.out.print(c+“ ”);

                    }
          }
}

So here print command print ascii value and space. This will run until variable reaches it's terminating value.

Here is the complete code.

Now save your java program with .java extension
After compiling(javac a1.java) run your java program with java “class name”


Then the final output is shown below.


------------------------
Note
------------------------

If you want simple letters you can start c=97 and terminating value as 123
eg: for(c=97;c<123;c++){}


Thanks.

Tuesday, March 31, 2015

Data Types in JAVA

Data Types

Premitive

Object

Integers
  • byte (-27 to 27-1)
  • short (-215 to 215-1)
  • int (231 to 231-1)
  • long (263 to 263-1)
(reference data type or array data type) 

Ex: String
Floating point
  • float (231 to 231-1)
  • double(263 to 263-1)
Characters
  • char (0 to 216-1)
Boolean
  • boolean(true/false)

Sunday, March 29, 2015

Getting started with JAVA programming

Getting started with JAVA programming 

 Are you new to java? If yes here is the way to become a java expert. How to install JAVA Development Kit on your computer 

 Step 1 

      Download java development kit from oracle. 

       Click here to download. (Use the images to get an idea)


Click on accept


Select your download type 64 bit or 32 bit 
and wait until downlaod complete.
Step 2
            After download complete run the setup.
Step 3
            Do not change install location and set it to be default
Step 4
            Wait until installation to be complete.
Step 5
           Now you have JAVA installed in your computer.

Step 6
           Then you need to set path to compile a java program. Here is the way.

Go to your java installed location. In my case it may be c:\program files\java\jdk1.7.0\ (may vary due to java version)

create a new folder named “My docs”.


Open that folder.
Now you are inside the folder named “My docs”
Now open notepad and type start and save it as “cmd.bat” in “My docs” folder.


Now go to c:\program files\java\jdk1.7.0\ bin (your may be vary)


Now copy the path in your address bar

if you are a window 8 user follow these steps;

  1. Drag the Mouse pointer to the Right bottom corner of the screen
  2. Click on the Search icon and type: Control Panel
  3. Click on -> Control Panel -> System -> Advanced System Settings
  4. Click on Environment Variables, under System Variables, find PATH, and double click on it.

  5. Now click on variable value field, put a ; at end of the value.

  6. Now paste copied path after the semi colon
  7. click on ok then again ok and ok.

Now go to c:\program files\java\jdk1.7.0\My docs
Now open CMD.bat file
Then type “javac” and press enter
If you get text like in the image below you are successful.


Now it is time to code java.

How to start java coding

Now you can start to code java. Here is an example
Open notepad .Type these text
class a1{

         public static void main(String args[]){

                     System.out.println("Hello JAVA");

        }

}
Now save this as "a1.java" in "My docs" folder.
Now open "CMD.bat" and type javac a1.java and press enter
Then if it was successful type java a1 and press enter.
Now in cmd you can see a text "hello JAVA".
Now do not close cmd keep it minimized and code some more java program.then save it.
Now again type javac and then type name of your saved java program with .java extension .
Then type java and  saved java program and press enter.


-------------------------------------------------------------

RECOMMENDED BY AUTHOR

Wednesday, February 4, 2015

Fonts in HTML

Use of different font styles


We can change font style using “font” tag
General syntax of a font tag
<FONT size=value color=colour face=font types></FONT>
We can use many font types by using commas.
Example:
<FONT face=Courier New,Times New Roman> This is Some text</FONT>
Here if first font is not available then browser show the text using second font.


How to change font size
General Syntax : <FONT size=value ></FONT>
Can change according to 2 methods.
1.use of numbers
We can use numbers from 1 to 7
1 for smallest 7 for largest and 3 for normal size
Then 1 and 2 are smallest size,3 is normal size and 4 to 7 are large size.
2.Use of relative values
Use +1 to +6 for increasing values and -1 to -6 for decreasing values

Example,
<FONT size=2 >This is font size 2</FONT>
<FONT size=7 >This is font size 7 (larger)</FONT>
<FONT size=+3 >This is relative font size +3</FONT>


Complete code,
<HTML>
<HEAD>
<TITLE>Fonts</TITLE>
</HEAD>
<BODY >
<P><FONT face=Courier New,Times New Roman > This is Some text</FONT><br/>
<FONT face=Times New Roman,Courier New,Georgia size=5> This is Some text</FONT><br/>
<FONT size=2 face=Courier New>This is font size 2</FONT><br/>
<FONT size=7 >This is font size 7 (larger)</FONT><br/>
<FONT size=+3 >This is relative font size +3</FONT><br/>
<FONT size=-1 >This is relative font size -1</FONT></P>
</BODY>
</HTML>


Output,