My Note
– BETA
Description
:
This is
a notepad program developed by PC-Cabinet.
With
this program you can write text files, HTML files, Java files, CSS
,Javascript ,Batch files and many more.
As this
is BETA version errors and bugs are not totally corrected.
We will
release our stable version shortly.
ClickHere to download My Note-Beta Version
ClickHere to download My Note-Beta Version zip file
Sunday, May 3, 2015

Friday, May 1, 2015
How use message boxes with C# application
How to use message boxes with C# application
Most programs use message boxes
to give messages to user. When we develop a software we have to deal
with message boxes. Message boxes can use to give messages,confirm
messages, warning messages , error messages and meany more. Here we
are going to discuss about message boxes in C# applications.
Now start with a new project.
Name it as you like. Here I have named it as “msgtest”.But you
can name it as you like or you can keep it unchanged with it's
default name “WindowsFormsApplication1”.

Now you have a form on your
screen.
Now let's code a simple message.
Double click on your form and
now you are at your code window.
Now type these codes.
MessageBox.Show(“This
is my first message”);
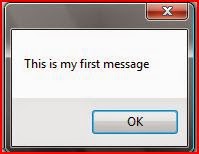
Now press “F5” or click on
“start debugging” in debug menu.
Now when your form loads windows
will show a message box with your message and with a “OK” button.
Now try this with a button.
Get a button to the form and
change it's text property as you like.
Now double click on your button
and type this code.
MessageBox.Show(“Button
clicked”, “My message”);
Now when you run your form and
click on your button message box will appear with a title “My
message”. This is the text that we used within double quotation
marks after the comma.
Now it's time to study about
this code.
The general form of a message
box is
MessageBox.Show(“Your
Message”, “Message title”);
But here you can't change
message box buttons and message box icon.
So there is another format.
MessageBox.Show(“Your
Message”, “Message title”, messagebox_buttons,
messagebox_icon);
Now let's try this in an button.
Get a new button to the form and change it's text property to “Click
Here” .Now double click it and you are at your code window. Now try
this code.
MessageBox.Show(“Do
you want to save changes to Document1?”, “Message1”,
MessageBoxButtons.YesNoCancel, MessageBoxIcon. Exclamation);
Now run this using “F5” key
or clicking “start debugging” in debug menu.
If you clicked on second button
you can see a message box with a title “Message1” and buttons “
Yes” , “No”, “Cancel”.
Here you can see an exclamation
mark as message box icon. Now it will remember you the message box
that will appear when we going to close a Microsoft Word document
without saving changes.(Check it your self)
Like above example try to create
message boxes that commonly used in programs to get an experience
about message boxes.
In C# you can use icons like
Question,information,exclamation,error, warning,Asterisk,hand none
and stop. These icons are mostly used by your Operating System and
many applications.
You can use buttons like
YesNoCancel, YesNo, OK, OkCancel, RetryCancel, and AbortRetryIgnore.
Now let's try to code buttons in
a message box.
Open a new project or clear your
current project.
In the form get a new button and
change it's text property to “msg_test” or whatever you like.
Now get a text box and change
it's text property as “Please click on the button”.
Now double click on the button
and code these codes.
switch(MessageBox.Show(“Do
you want to check messages ?”,
“Message”,MessageBoxButtons.YesNoCancel,MessageBoxIcon.Question)){
case
DialogResult.Yes :
textBox1.Text(“You
clicked on Yes”);
break;
case
DialogResult.No:
textBox1.Text(“You
clicked on No”);
break;
default
:
textBox1.Text(“You
clicked on Cancel”);
break;
}
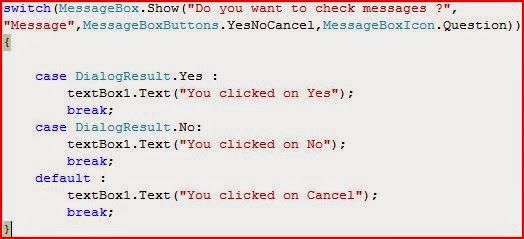
Here
I used a “switch case” statement , but you can also use if else
statements.
Now
if you run this and click on your button then a message box will
appear and text in your text box will change correspond to the Yes,
No,or Cancel button you clicked.

Now
try with different buttons and different icons.
Thank
you!
--------------------------------------------------------------
Recommended by author
How to use sounds in a C# application
INTRODUCTION TO PYTHON
Creating your first HTML document
Thursday, April 30, 2015
How to view basic information about your computer
How
to view basic information about your computer
In
Microsoft Windows you can view your computer's basic information
easily. Here I'm going to list out how to do it.
Basically
there are many ways to display computer's basic information.
Method
1
(for
windows XP,vista and 7)
Click
on the “start” button .In windows XP you can find it at the left
side of the task bar. In Windows Vista and 7 there is a windows logo
at left side of your task bar.
Then
a menu will appear in left side of your monitor (with default task
bar settings).
Then
you can see a button named “computer”(actually this is not a
button).
Then
keep your mouse pointer on it and perform a right click.
Then
again you can see a drop down menu. Here at the bottom you can see
“Properties” click on it and now you can see your computer's
basic information.
Method
2
In
your desktop there is an icon named “Computer”(in Win 8,7 and
Vista) or “My Computer”(In Win XP) .Then simply right click on
it. Now there is a drop down list. Form that click on properties(at
the bottom of the list).Now you can view your computer's basic
information.
Method
3
(for
windows XP,vista and 7)
Click
on “Start” in task bar and click on control panel. Now you have
control panel on your screen. If your view is “Control Panel Home”
Then click on “System and Maintenance”.Then click on “System”
and now you can view your computer's basic information.
If
your view is “Classic view” Then double click on “System”
and now you can view your computer's basic information.
Method
4
(for
windows vista )
Click
on “Start” then “All Programs” then “Accessories” then
open “Welcome Center” . Here you can see some links to open
various tasks.
Double
click on “View computer details”. Now you can view your
computer's basic information.
Method
5
(for
windows vista and 7)
Open
“Computer”. Then in computer window below the address bar there
is a link name “System Properties”. Click on it.
There
you can see your computer's basic information.
Method
6
Open
“Computer” . Then right click on computer window (not on disk
drives). Then in pop up menu You can see “Properties”. Click on
it and your computer's basic information is on your screen.
Method
7
(for
windows 8 and 8.1)
If
you are in Start screen go to desktop by click on “desktop” tile
or pressing “Windows key +D”. Then move your mouse to the right
border of your screen. Then you can see a pop up menu. Then click on
“Settings”. Then click on “PC info” and your computer's basic
information is on your screen.
Method
8
(for
windows 8 and 8.1)
If
you are in Start screen go to desktop by click on “desktop” tile
or pressing “Windows key +D”. Then press “Windows key+ i”
combination. Then you can see a pop up menu. Then click on “PC
info” and your computer's basic information is on your screen.
Method
9
(for
windows 8 and 8.1)
Use
key combination “windows key +x”. Then at bottom left of your
screen pop up menu will appear. Click on “System” and your
computer's basic information is on your screen.
---------------------Related articles----------------------
---------------------Related articles----------------------
How to use sounds in a C# application
How
to use sounds in a C# application
Various
programs use various sounds to give an alert about various tasks.
Here in C# we can use various sounds with form's load event,for a
button click, for a check box etc... Basically there are two methods
to use sound in C#.
First
one is :-By using beep tones and second is by using audio
files(.wav,.mp3 etc...).
So
this post is about beep tones.
In
Windows operating system there are various sounds to inform user
about some tasks like “low battery”, “updates available”
etc.. In some cases windows use beep tones also. So let's get know
about how to use beep tones in a C# application.
First
create new project and name it as “beeptest”.
Now
double click on your form1 and here you have code window and you are
at form's load event.
Then
type this code →
Console.Beep();

and
press “F5” or go to debug and click on “Start Debugging”.
Now
you can here a beep tone when form loads.
Now
try to use beeps with a button.
Now
get a button to form and change it's text as “Click to beep” .

Then
double click on the button and type this code in button's click
event.
Console.Beep();

Now
if you run this and click on the button you can here a beep tone.
Now
let's study about the code “Console.Beep();”.
This
is the general form of beep tones. But you can change the frequency
of beeps. Now look at the code below.
Console.Beep(Frequency,Time
period);
Here
frequency varies from 37Hz to 32767Hz. If you want to use base sounds
you can use low frequencies like 37,40 ,50 39 etc..
Time
period means the amount of time that you can here the beep. Here in
C# to here a beep sound for a 1 second you must use time period as
“1000”.
Now
get a new button and code this in it's click event.
Console.Beep(400,1000);
After
running and clicking on the button1 you can here a beep tone with
400Hz frequency for a period of one second.
Try
some more examples by changing frequency and time period.
Now
I think you have got it.
Here
we are going to make a soft organ with the help of beep tones.
Now
open a new project and name it as “softorgan”.
Now
change your form's name as you like or keep it as it's default
(form1).
Here
we have to use 13 buttons.
Get
a button to the form.
Now
change it's text property as “&S”.
Now
get a label to the form and keep it under the button and change it's
text property to “C”.
Now
get another button and change it's text property as “&E”.
Now
get another label to the form and keep it under the button and change
it's text property to “C#”.
Accordingly
get another 11 buttons and change there text properties as , “&D”,
“&R”,“&F”,“&G”,“&Y”,“&H”,“&U”,“&J”,
“&I”, “&K” and “&L”. Then get 11 labels and
change their text properties as “D”, “Eb”, “E”, “F”,
“F#”, “G”, “Ab”, “A”, “Bb”, “B”and “C”.
Now
look at the picture below and align your buttons and labels as keys
in keyboard.

Now
it's time to code.
Double
click on key C (first button) and type this code →
Console.Beep(261,200);
Now
code these codes accordingly second button and so on.
Second
button(C#) Console.Beep(277,200);
Third
button(D) Console.Beep(293,200);
Fourth
button(Eb) Console.Beep(311,200);
Fifth
button(E) Console.Beep(329,200);
Sixth
button(F) Console.Beep(349,200);
Seventh
button(F#) Console.Beep(370,200);
Eighth
button(G) Console.Beep(392,200);
Ninth
button(Ab) Console.Beep(415,200);
Tenth
button(A) Console.Beep(440,200);
Eleventh
button(Bb) Console.Beep(466,200);
Twelfth
button(B) Console.Beep(494,200);
Thirteenth
button(C) Console.Beep(523,200);

You
can change the amount of time period by increasing or decreasing the
value “200”.
Now
it' time to play our soft organ.
Press
F5 or go to debug menu and click on “start debugging”.
Now
you can play using your mouse or using appropriate key in your
keyboard.
(ex:
to play C press “s” in your keyboard)
Thank
you!
Tuesday, April 7, 2015
How to print alphabet using char values in JAVA
First you have to code a java program by using variables and a flow control.
You may need:
- a char variable to store current char value
- flow control structure (for,while,or do while loop)
- command to print current char value
First we create a class program and a main method using java
class ascii{
public static void main(String args[]){
}
}
Now create a char variable to store a char value and initialize it to zero.
class ascii{
public static void main(String args[]){
char c=0; //char variable named c
}
}
Now we want a flow control structure to automate printing process. Here I used for loop but you can use while or do while loop also.
class ascii{
public static void main(String args[]){
char c=0; //char variable named c
for(c=65;c<91;c++){
}
}
}
Here I have initialize c as 65 (c=65) because “A” in ASCII is 65 and terminate value as 91 because here I stop printing process after printing “Z”.
Now we want a command to print this in command prompt screen.
class ascii{
public static void main(String args[]){
char c=0; //char variable named c
for(c=65;c<91;c++){
System.out.print(c+“ ”);
}
}
}
So here print command print ascii value and space. This will run until variable reaches it's terminating value.
Here is the complete code.

Now save your java program with .java extension
After compiling(javac a1.java) run your java program with java “class name”

Then the final output is shown below.

------------------------
Note
------------------------
If you want simple letters you can start c=97 and terminating value as 123
eg: for(c=97;c<123;c++){}

Thanks.
Subscribe to:
Posts (Atom)